Deploy and test your projection
This guide will walk you through deploying your first projection on Datai Network, or for testing purposes on your local machine. Before you start, please make sure you have followed the steps from the previous guide.
Deploying a projection is simple, and Datai CLI will handle most of the heavy lifting.
Filtering events with topics
When defining eventHandlers, you can filter specific event parameters using topics to significantly reduce the amount of indexed data.
This is especially useful during local indexation, where indexing an entire protocol might take hours or even days.
For example, if you want to track only transfers involving a specific address (e.g., a particular user or pool),
you can use the topic2 or topic1 filter depending on which parameter position you’re targeting:
eventHandlers: - event: Transfer(indexed address,indexed address,uint256) handler: handleTransfer topic2: - '0xeb8dfecd1d9447f31122cae7f1bada00dda9746c'Deploying a projection locally
Before you begin, make sure you have the following prerequisites:
-
Create .env file and make sure you have an archive node for a network of your choice. Please note that you need all of the following environment variables present, even if you don’t have access to particular networks.
.env RPC_PROVIDER=NETWORK=LOG_LEVEL=debugTEST_MODE=trueConfigure these in your
.envfile:-
RPC_PROVIDER– Required
RPC URL for your blockchain provider (e.g. Infura, Alchemy). -
NETWORK– Required Options:mainnet,base,optimism,sepolia,arbitrum, etc.
-
-
Make sure you are inside of the dev container.
CTRL + Shift + P-Dev Containers: Rebuild and Reopen in Container. Every command you will ever need to run will be from within the container.
yarn deploy TEMPLATE PROTOCOL MODULE NETWORKThis command will deploy both the subgraph and the watcher build into a Docker volume, allowing it to be utilized by the host application.
Deploying watcher and subgraph separately
You can also deploy the watcher and subgraph separately by running the following commands. This is useful in cases where you find errors in one of the components and after fixing them, you’d like to deploy only the fixed part.
Deploying subgraph
yarn deploy TEMPLATE PROTOCOL MODULE NETWORK graphDeploying watcher
yarn deploy TEMPLATE PROTOCOL MODULE NETWORK watcherRun the host application
To ensure the accuracy of positions within your deployment, you can utilize the public host image. Since this image is part of the internal Datai application and provided for testing purposes only, we strongly recommend running it within a Docker Compose environment. This setup will include all necessary environment variables and facilitate communication between internal services.
The host image is already included in the project’s Docker Compose configuration. To start the service, navigate to the root directory of the project and run:
docker compose up -d hostCheck status
The indexation process can take some time to complete, depending on the size of the network and the number of positions to be indexed. You can monitor the progress in the host application logs. Here’s how to check the status.
docker logs hostFetch the data
Once the indexation process is complete, you can fetch the data from the host application. Here’s how to do it.
curl http://localhost:9001/activePositions?user=USER_ADDRESS&chain=NETWORK&local=trueReplace PROTOCOL, MODULE, NETWORK, and 0x123456789 with the appropriate projection details and user address.
Deploying a projection on Datai Network
Having deployed and tested your projection locally, it is now time to deploy it to Datai Network.
Steps for submission
-
Access the projection dev container: Ensure you are within the projection development environment (the dev container) where the projection has been developed and tested.
-
Submit the Projection: Execute the following command within the dev container to submit the projection data to IPFS:
terminal(dev-container) yarn submit TEMPLATE PROTOCOL MODULE NETWORK- TEMPLATE: Replace this with the specific template name used in your projection.
- PROTOCOL: The protocol identifier associated with the projection.
- MODULE: The module name that the projection is part of.
- NETWORK: The network (e.g., mainnet, polygon, arbitrum) where the projection will be deployed.
-
Verify the Submission: After the submission, you should receive a hash that represents the IPFS CID of the projection data.
terminal (output) Deployment Submitted: Please proceed with staking MDN tokens usingthe hash [deploymentResultsIpfsHash] to initiate the indexation process.[deploymentResultsIpfsHash]: The is placeholder will be the actual IPFS CID hash generated upon successful submission to the network.
Stake and Activate the Projection
Using Datai Network Console, you can stake and activate your projection. The process is simple and can be done in a few steps.
- Open the Datai Network Console.
- Navigate to your projections and select the one you’ve just finished developing.
- Using the hash you received after the submission input it in the IPFS hash field.
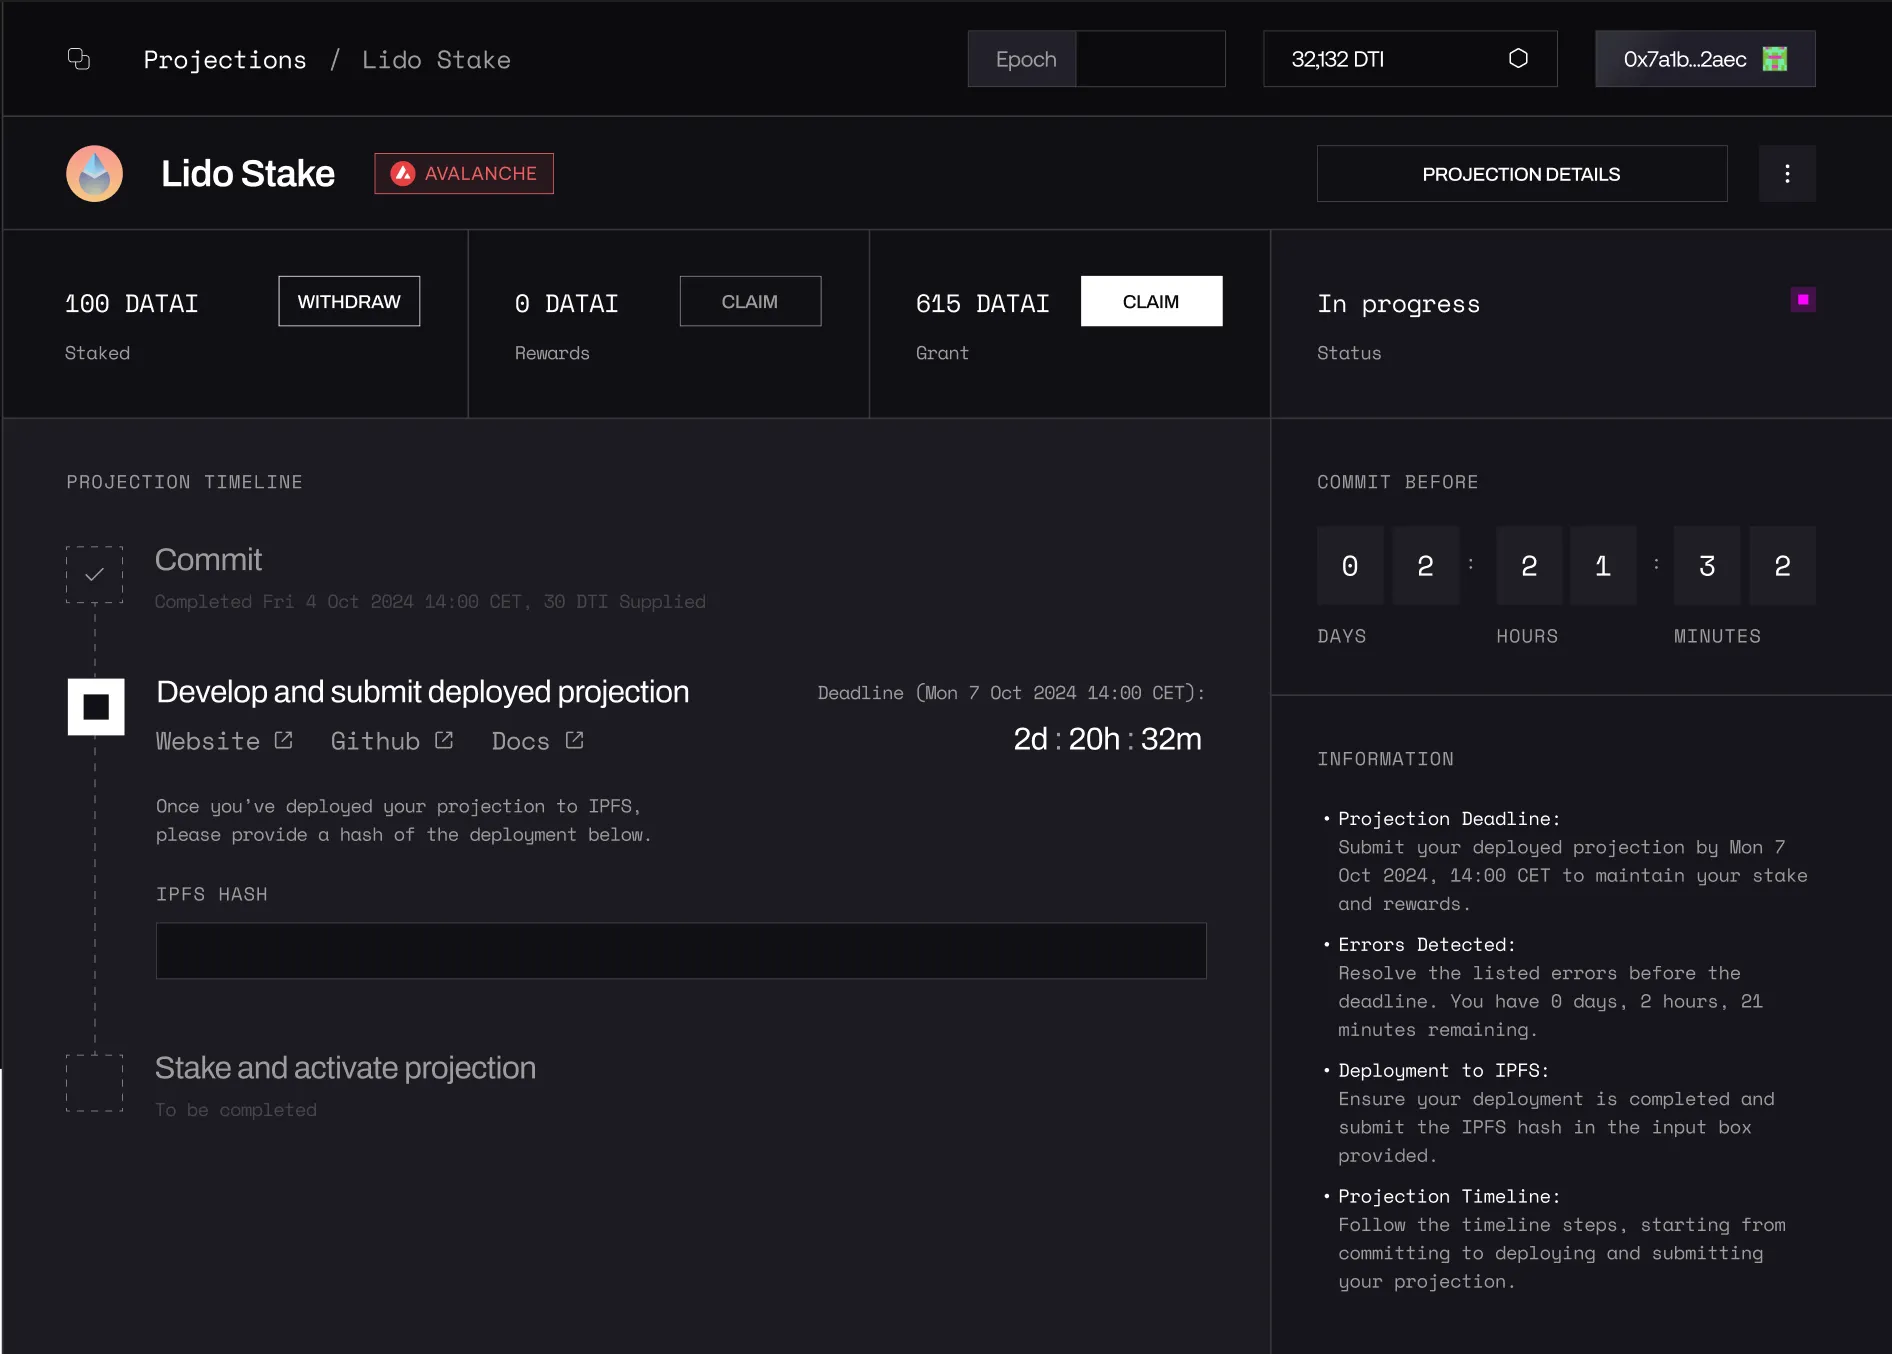
- Next, stake and confirm your projection registration.
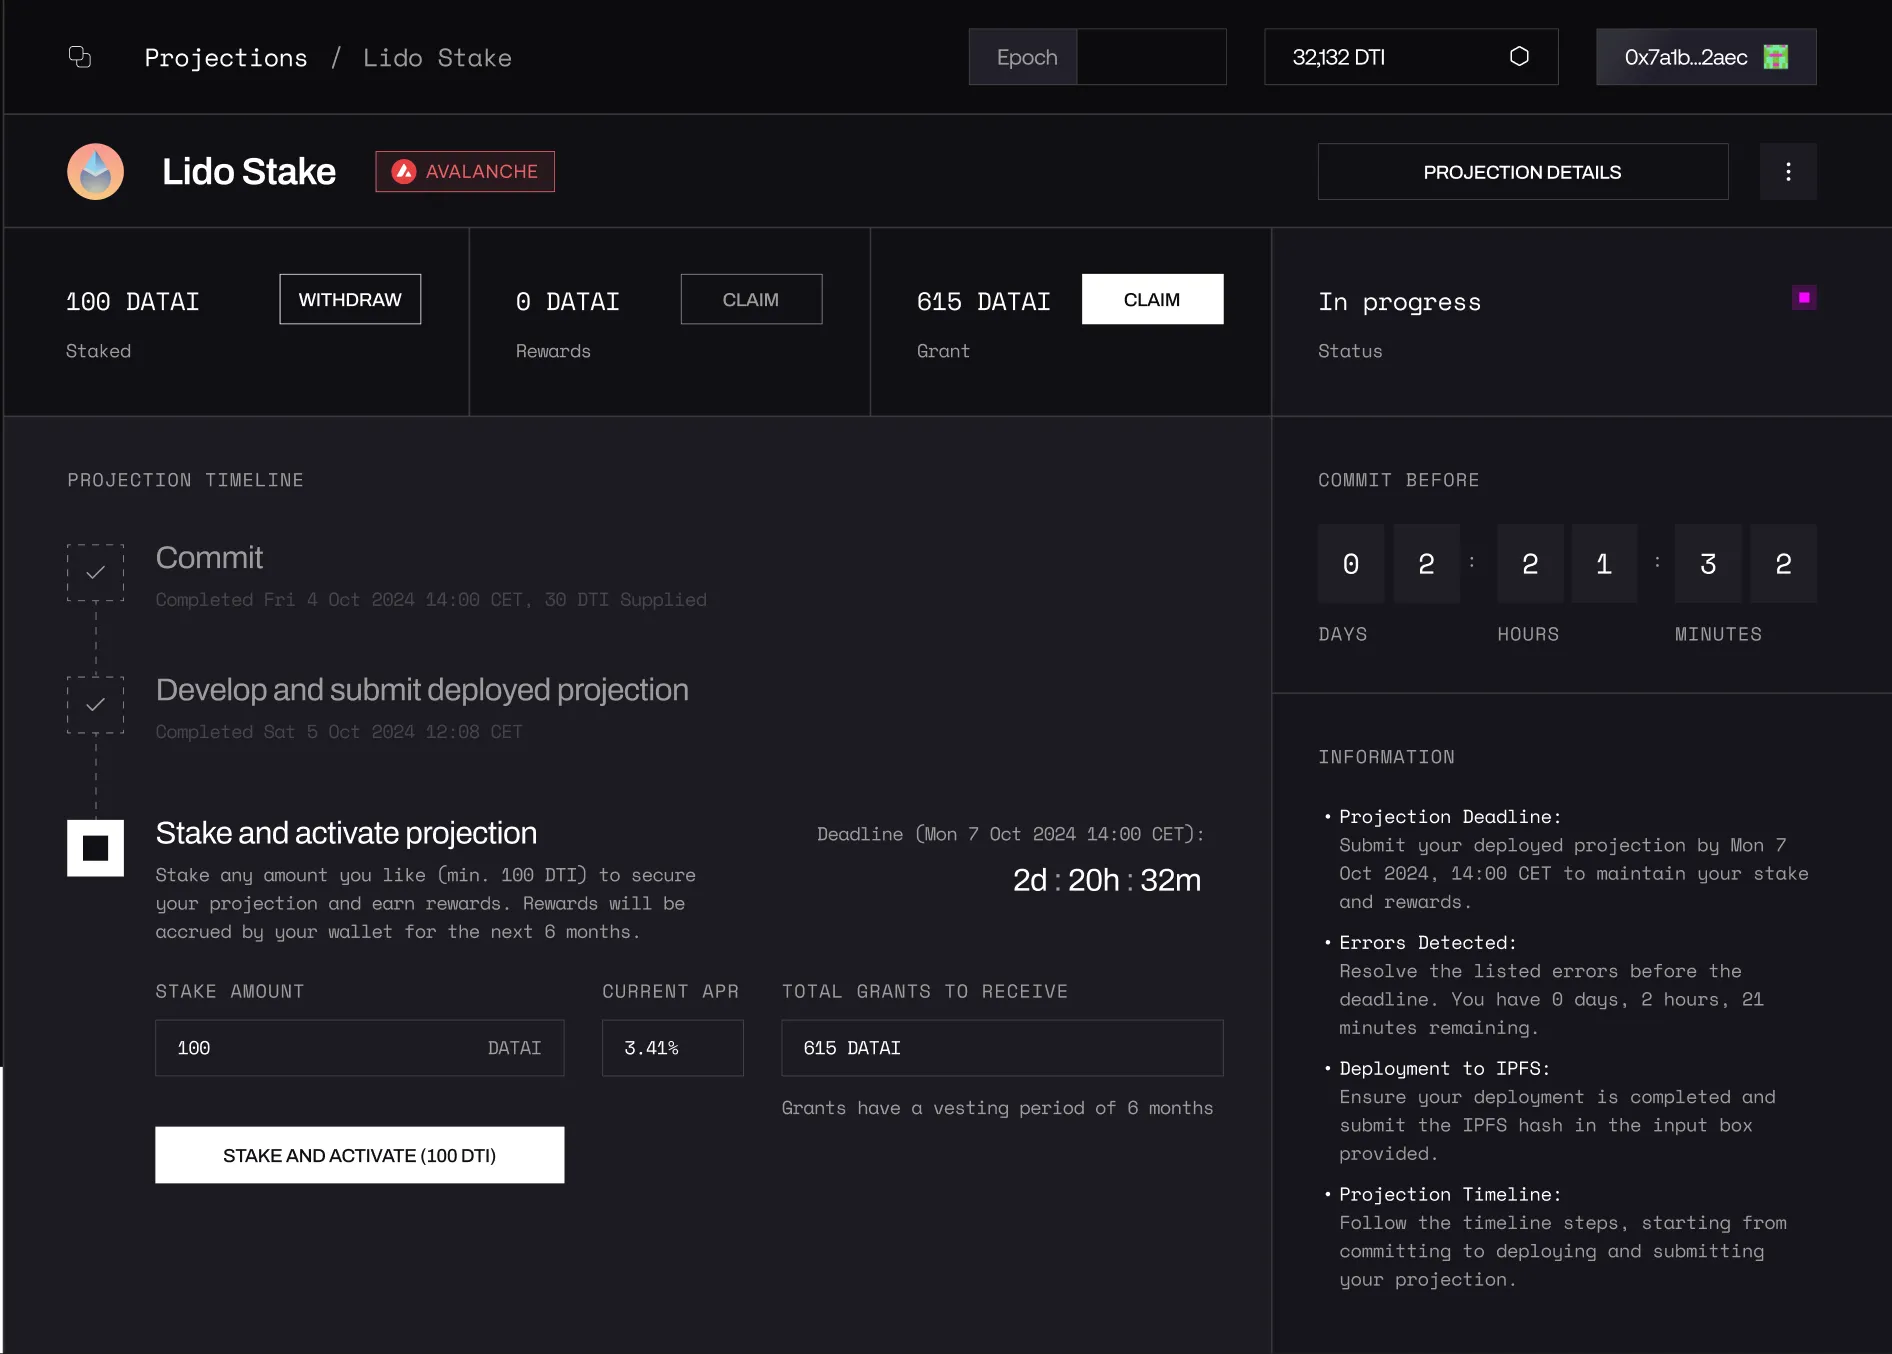
- Confirm the transaction in your wallet and wait for the network confirmation.
Once you’re done setting up and testing your projection locally, it’s a good idea to verify that your data matches real usage.
You can do this by checking the live projection data as a consumer, comparing values like token balances, TVL, volume, etc.
This helps ensure that your indexing logic, filters, and event handling are working as expected.
🔍 Treat this as a sanity check — if values don’t match what you see on-chain or on public dashboards, something might be wrong in your event setup or contract filters.